My Guide to a Perfect Class II Composite Restoration: A Modern Dental Matrix Technique
A Class II restoration can be a real challenge in our daily work. Many dentists might struggle with getting tight contacts and the right shape, especially when we switched from amalgam to composite. This article shares my personal, step-by-step method for placing a Class II composite restoration that looks good and lasts a long time. You will learn the tips that took me years to figure out. This guide will help you avoid common mistakes. It will make your restorative work easier and better. This process will improve the predictability of your outcomes for this common dental procedure.
What Is a Class II Restoration in Modern Dentistry?
A Class II restoration is one of the most common procedures. So, what is it? A Class II restoration is a filling that we place in a back tooth, like a molar. The key is that the cavity involves at least one of the sides of the tooth that touches another tooth. We call these the proximal surfaces. This could be the mesial surface, which faces the front of the mouth, or the distal surface, which faces the back. Often, the cavity also includes the top, or occlusal, surface of the tooth.
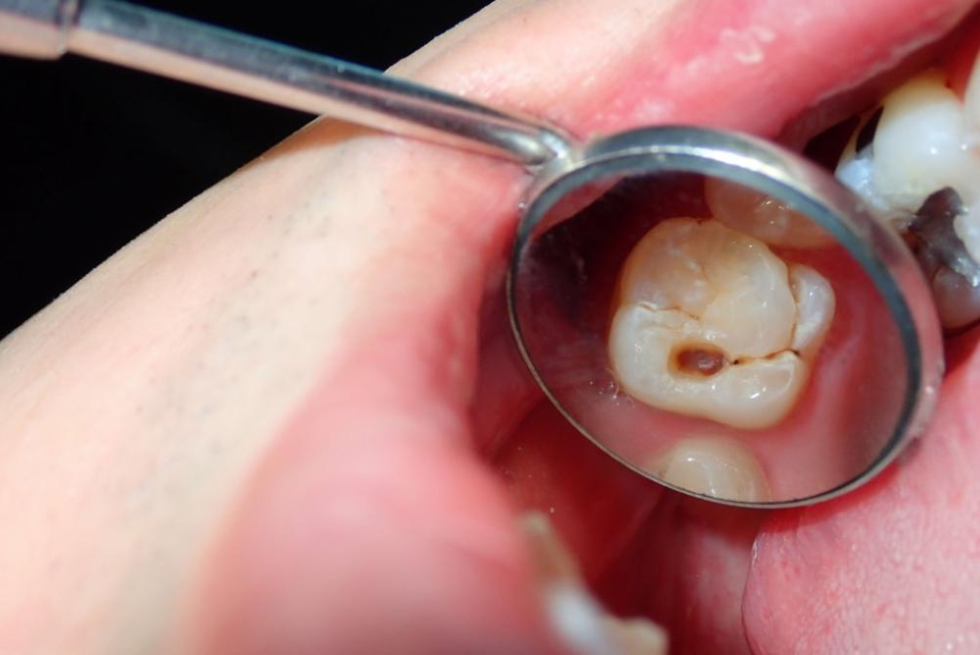
The need for this type of restoration almost always starts with caries, which is the fancy word for tooth decay. This decay has eaten away at the tooth structure. My job as a dentist is to remove that decay and rebuild the tooth. In modern dentistry, the goal is to make the restoration look and feel like a natural tooth. This is a big change from how things used to be. The materials and techniques we have today for a Class II restoration are amazing.
The goal of any good dental work is to fix damaged teeth. A Class II procedure is a perfect example of this. We take a tooth that has been weakened by decay and make it strong and useful again. The final composite restoration should blend in perfectly. No one should be able to tell that work was done. This is the standard of care in modern restorative dentistry. It is what patients expect from their dental professionals.

Why Choose Composite Over Amalgam for a Class II Restoration?
For a Class II restoration, it was the go-to choice because it was strong and durable. The biggest reason is that composite is a tooth-colored material. My patients love that their fillings don't look like metal. A well-done composite restoration is nearly invisible.
But the benefits go beyond just looks. Composite resin materials are bonded to the tooth. This means we use a special adhesive glue to make the filling stick. This bonding makes the tooth stronger than it was before. With amalgam, we had to cut away more healthy tooth structure just to make the filling stay in place. This is a huge win for the long-term health of the tooth. This is a core principle in modern operative dentistry.
So, when we look at composite versus amalgam, the choice is clear for me. The composite allows for a more beautiful and more conservative restoration. While some people still debate this, the improvements in composite resin have made it strong enough for posterior teeth. The success of a Class II composite restoration depends entirely on your technique. If you do it right, the resin restoration will serve the patient well for many years. It represents a higher level of care in my opinion.
How Do You Prepare the Perfect Class II Dental Cavity?
A great restoration starts with a great preparation. Your first thought should be to save as much of the healthy tooth as you can. Use a small, precise bur to carefully remove only the carious tissue. This is a big difference from the old days of amalgam, where we had to create a specific shape for the filling to hold. The cavity preparation for a composite is all about removing the bad and keeping the good.
The next critical step is isolation. You cannot let saliva or blood get into the cavity when you are placing a composite restoration. If the area gets wet, the bonding agent will not work. A rubber dam is a sheet of rubber that isolates the tooth. It keeps the area perfectly dry and clean. It takes a minute to put on, but it saves me so many headaches. This step is a must for any kind of direct composite work.
Once the carious part is gone and the tooth is dry. The walls should be smooth and clean. There should be no sharp angles that could create stress in the final restoration. This careful cavity preparation is a key part of what we do in operative dentistry. It sets the stage for all the steps that follow. A clean, dry, and conservative cavity was prepared for a successful restoration.
What Is the Key to a Successful Class 2 Restoration? (The Matrix System)
If you ask what the single most important part of a Class II composite restoration is, it's the matrix. The matrix is the temporary wall we build around the tooth. This wall allows us to pack the composite material and shape it correctly. For a Class II cavity, the matrix creates the new proximal wall that will touch the adjacent teeth. Getting this wall right is everything. A bad matrix leads to a bad contact point, food getting stuck, and a failed restoration.
For years, we used a type of matrix called a Tofflemire. It was great for amalgam, but it is terrible for composite. It’s a straight band of metal that doesn't create the natural, curved shape of a tooth. Sectional matrices are small, pre-curved pieces of metal. They are held in place with a ring that separates the teeth slightly. This matrix technique helps me create a perfect, tight contact point every single time. Brands like Garrison, Palodent from Dentsply, or the system from 3M all make great sectional matrices.
The matrix system does two things. First, the matrix band gives the restoration its shape, or contour. The pre-curved matrix helps me build a wall that looks like a real tooth. Second, the ring pushes the teeth apart just a tiny bit. After the restoration is done and the matrix is removed, the teeth move back together. This creates a beautifully tight contact. A good matrix is the secret to a predictable and successful Class 2 restoration. It is not a step where you want to cut corners.
How Do I Place the Composite to Build a Strong Restoration?
Once the matrix is in place, it is time for placing the composite. This is where many mistakes can happen. You cannot just put a big blob of composite resin into the cavity and call it a day. The reason is something called polymerization shrinkage. When the composite material is hardened with a light, it shrinks a little. If you fill the whole cavity at once, this shrinkage can pull the filling away from the tooth walls. This can create a gap, which leads to problems later.
The solution is to place the composite in small layers, or an increment. Do not use a layer thicker than 2 mm. Place the first increment of composite at the bottom of the deepest part of the cavity. Then use an instrument to shape it carefully, making sure there is no void or air bubble. Then, cure it with light. Repeat this process, adding one small increment at a time, until the cavity is full. This incremental technique minimizes the stress from shrinkage.
This step-by-step layering is critical for a durable restoration. Each layer of composite resin is cured separately. This ensures that the entire restoration is fully hardened. It takes more time than just filling it all at once, but it is the right way to do it. This method leads to a stronger, better-sealed restoration. It's a key part of making posterior composite restorations last. This technique is a standard in good restorative dentistry.
Are Flowable Composites Useful in a Class II Restoration?
Are flowable composites just a gimmick, or are they truly useful? In my experience, the use of flowable materials is a huge help for a Class II restoration. A flowable composite is a type of composite resin that is much runnier. It flows easily into all the little nooks and crannies of a cavity preparation.
Place a thin layer of flowable composite right on the floor of the proximal box. This is the deepest part of the Class II cavity, down by the gum line, or gingival area. Because the flowable material adapts so well, it creates a perfect seal at this critical marginal area. This helps prevent gaps and leakage. Some modern materials, like the SDR (Smart Dentin Replacement) flowable from Dentsply, are designed for this. SDR is a bulk fill flowable that can be placed in a thicker layer.
After curing that first thin layer of flowable composite resin, then switch to regular, thicker composite to build up the rest of the restoration. Using a flowable composite at the base of the cavity has made my Class II fillings more predictable. It acts as a perfect liner and stress-absorber. A great dental product from a company like Dentsply or 3M can make this process smoother.

What's the Right Way to Cure a Posterior Composite Restoration with Curing Lights?
Placing the composite is only half the battle. You have to make it hard. We do this with special curing lights. But just shining the light at the tooth is not enough. The way you cure the restoration is very important for its long-term success. If the composite is not fully cured, it will be weak. It can wear down quickly or even break. A poorly cured restoration is a failed restoration.
First, the tip of the curing light needs to be as close to the composite as possible without touching it. The further away the light is, the less energy reaches the restoration. I make sure my light's tip is clean and directly over the increment of composite I am curing. Second, you have to cure for the right amount of time. The manufacturer of the composite (like 3M or Dentsply) will tell you how long to cure each layer. Do not rush this step. I usually add a few extra seconds just to be safe.
For a Class II restoration, you also need to cure from the sides. After I build up the whole restoration and before I take off the matrix, I will cure from the cheek side (the buccal) and the tongue side (the lingual). This helps ensure that the deepest parts of the filling get enough light. Good curing lights and proper technique are essential for any posterior composite restorations. It turns the soft resin into a hard, durable restoration.
How Can You Create Natural Anatomy in Your Dental Restoration?
The final restoration should not look like a flat filling. A real tooth has a complex anatomy on its chewing surface. It has hills, which we call cusps, and valleys, which we call grooves. My goal is to recreate this natural anatomy in my composite restoration. This is not just for looks. A properly shaped occlusal surface helps the patient chew correctly and feels more comfortable.
I build up the anatomy of the tooth as I place my final layers of composite. I use special instruments to gently shape the composite before I cure it. I create the main cusp slopes and the central groove. I also focus on building a nice marginal ridge. The marginal ridge is the raised edge of the restoration next to the contact point. A well-formed ridge helps prevent food from getting stuck and gives the restored tooth a natural shape.
After the final layer is cured, I can refine the anatomy even more with a fine-tipped bur. I smooth the surfaces and make sure the groove and crest of each cusp look right. This part of the process is like being a tiny sculptor. It takes a bit of practice, but it makes a huge difference. A restoration with good anatomy functions better and looks a hundred times more professional. The final resin restoration should be a work of art. You can find a series of dental instruments on ISTAR Dental Supply to help you finish the treatment.
What Are the Final Steps After Finishing the Restoration?
After all the composite has been placed and cured, the main part of the restoration is done. But there are still a few very important final steps. The first is the careful removal of the matrix system. I take off the ring and then gently slide the matrix band out. I always check the contact point with a piece of floss. It should snap through nicely, which tells me the contact is tight. This is a moment of truth for any Class II restoration.
Next comes finishing and polishing. I use a series of fine burs and polishing points to smooth the entire restoration. I smooth the occlusal surface and the buccal and lingual surface. I also smooth the marginal areas where the restoration meets the tooth. A smooth restoration feels better to the patient's tongue and is less likely to pick up stains. Polishing also brings out a nice shine, making the composite look like natural enamel.
Finally, and most importantly, I check the bite, which we call the occlusion. I have the patient bite down on a piece of colored marking paper. The paper leaves marks on any high spots on the restoration. A high spot can cause pain and even break the restoration or the opposing tooth. I carefully adjust any high spots with my bur until the bite is perfect. Checking the occlusion is a critical final step for all direct restorations.
How Can You Ensure Your Class II Restoration Lasts?
I want every Class II composite restoration I do to last for many, many years. The key to making that happen is not a secret. It is about doing every single step of the operative procedure correctly. There are no shortcuts to a high-quality restoration. From the initial cavity preparation to the final check of the occlusion, every detail matters. This focus on process is what leads to predictability in our work.
The success of direct posterior composite work rests on a few key pillars. First, proper isolation with a rubber dam. Second, using a good sectional matrix system to create a tight contact and proper contour. Third, placing the composite in small increments to control shrinkage. Fourth, using a high-quality bonding agent and a reliable restorative material, like Filtek from 3M or materials from Dentsply. And finally, a complete cure with good curing lights.
When you follow these steps carefully, you will create successful outcomes. The restored tooth will be strong, well-sealed, and beautiful. These restorative procedures become routine and much less stressful when you have a system that works. My advice to all dental professionals is to master the fundamentals of the class ii composite restoration. This will give you confidence and provide your patients with excellent, long-lasting care. The materials used and the technique are a perfect match for optimal results.
Key Things to Remember
-
A Class II restoration fills a cavity on the side of a back tooth. Composite is the modern choice over amalgam.
-
Always use a rubber dam to keep the tooth dry for the best bond.
-
Use a sectional matrix system. This is the secret to getting a tight contact point and a natural tooth shape.
-
Place the composite in small layers (no more than 2 mm) to avoid problems from shrinkage.
-
A thin layer of flowable composite at the base of the cavity can create a better seal.
-
Cure each layer properly with your curing light. Get the light close and cure for the full recommended time.
-
Take time to create natural anatomy and check the bite carefully. A high spot on the restoration will cause problems.