Dental laboratory scanners — how to choose?
Choosing a dental lab scanner can feel a bit like buying a new milling machine and hiring a new technician at the same time. It’s a big investment, it affects every case you touch, and you’ll probably live with that decision for 5–7 years or more. No pressure, right?
The good news: modern dental laboratory scanners are mature, reliable technologies. Most mainstream systems deliver high accuracy; what really separates them is how they fit your lab’s workflow, people, and business model rather than just their spec sheets.
-
In this guide, we’ll walk through:
-
What lab scanners actually are (and how they differ from intraoral scanners)
-
What they can do for different types of labs
-
How to think about accuracy in real life, not just microns on a brochure
-
Practical comparison criteria: color, cameras, software, support, price, openness, automation
-
How to plan implementation so your scanner doesn’t become an expensive dust collector
What is a dental lab scanner?
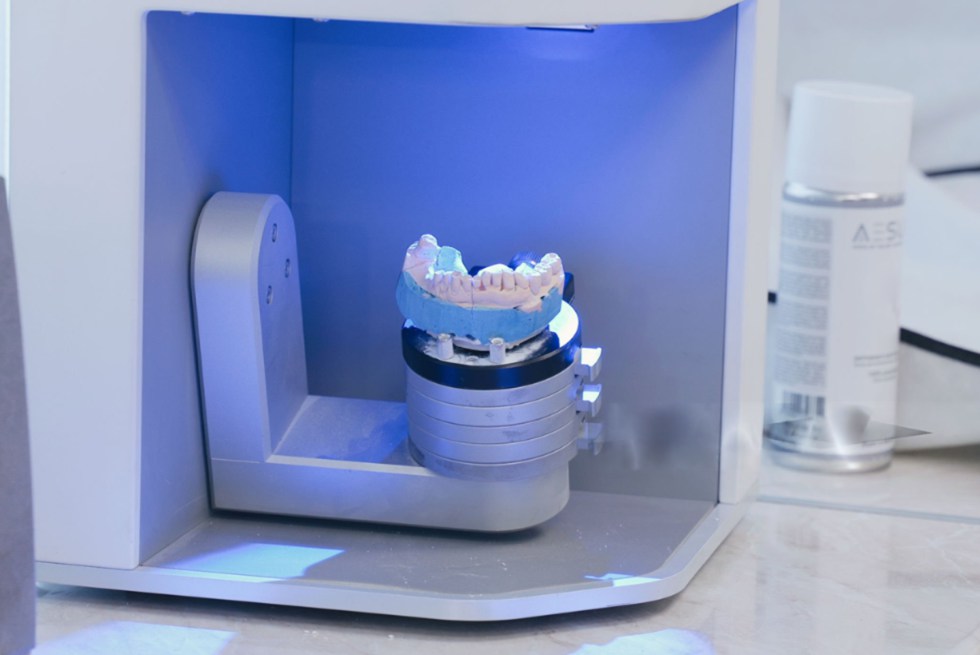
At its simplest, a dental lab scanner (often called a desktop or benchtop scanner) is a device that digitizes physical objects from the lab:
-
Stone models
-
Impressions
-
Wax-ups
-
Frameworks, bite registrations, sometimes articulators
It uses optical technologies like structured light or laser to capture the surface and turn it into a 3D model (usually STL, PLY, or OBJ) that your CAD software can work with. Standards such as ISO 12836 define how the accuracy of these dental digitizing devices is tested.
Most lab scanners are:
-
Closed housing desktop units to control ambient light
-
Equipped with a motorized turntable and/or tilting axes
-
Paired with scanner software that handles calibration, scanning strategies, and file export
-
When people say “going digital” in the lab, the scanner is usually the first big step:
-
It replaces manual model duplication and analog workflows
-
It becomes the “entry gate” into your complete CAD/CAM ecosystem
-
It lets you accept digital impressions, but also breathe new life into analog cases
What can dental laboratory scanners do?
If you’re still mainly pouring impressions and waxing by hand, a lab scanner can feel almost magical. Once a model is digitized, you can design, store, and reuse it infinitely — without shelves full of plaster.
A modern dental laboratory scanner typically supports:
-
Fixed restorations: single crowns, inlays/onlays, veneers, full-coverage bridges
-
Implant restorations: scanbodies, multi-unit cases, complex frameworks where accuracy is critical
-
Removable: RPD frameworks, complete dentures, partials
-
Orthodontic & aligner work: study models, aligners, indirect bonding trays
-
Splints and guides: nightguards, bite splints, surgical guides
-
Beyond basic production, a scanner can also help you:
-
Archive cases digitally instead of storing physical models
-
Reproduce lost restorations by reopening old designs or scans
-
Communicate visually with clinicians using 3D viewers or screenshots
-
Standardize quality control, e.g., by comparing designs to milled output
In other words, the scanner is not just a “digital impression box” — it becomes the memory and measurement center of your lab.

Start with your lab: defining your real needs
Before diving into camera counts and micron numbers, it’s worth taking an honest look at your own lab. The “best” scanner for a boutique crown & bridge lab is different from the best scanner for a high-volume full-arch implant center.
Think in terms of who you are today and who you want to be in 3–5 years:
-
Case mix: mostly crowns and small bridges, or lots of implant and full-arch cases?
-
Volume: dozens of cases a week, or hundreds?
-
Turnaround: is same-day or 24-hour delivery a competitive advantage for you?
-
Team: do you have CAD/CAM-savvy technicians, or is this everyone’s first digital step?
-
A quick self-assessment checklist:
-
“We absolutely must excel at…” (e.g., implant bars, digital dentures, aligners)
-
“We would like to add in the next 2–3 years…” (new indications, in-house milling/printing)
-
“Our biggest current pain points are…” (remakes, communication, bottlenecks, storage)
-
“Our typical client is…” (price-sensitive, premium, implant-heavy, ortho-focused, etc.)
Having this picture clear makes all the later comparison criteria much easier to weigh. For example, a small local lab might prioritize simplicity and total cost of ownership; a growing regional lab might invest more in automation and high-end accuracy for complex implant work.
How to assess a scanner’s accuracy?
Accuracy is often the first number people look at — and the easiest one to misunderstand.
In dental metrology, accuracy is usually broken into two parts as defined in ISO 5725 and used in ISO 12836:
-
Trueness: how close the scan is to the “real” object
-
Precision: how consistent repeated scans are with each other
Many modern lab scanners achieve single-digit to low double-digit micron deviations under standardized conditions, and studies show that current models can deliver reliable full-arch scans, often matching or outperforming intraoral devices for model-based workflows.
-
When evaluating accuracy, look at:
-
Independent studies, not just the brochure: are there peer-reviewed tests or lab benchmarks?
-
Test setup: was it done under ISO-like conditions, or in real-world lab situations?
-
Use-case relevance: full-arch, implants, edentulous models are much more demanding than a single die
-
Repeatability over time: does the system hold calibration, or drift and need frequent re-calibration?
Also remember the trade-off: more raw detail means more data to compute. Extremely high resolution can slow down scanning and processing — which might not be necessary for simple single-unit work. The “right” accuracy is the one that reliably meets your clinical indications without bogging down your workflow.
Comparison of dental lab scanners
Once you know your own needs and understand the accuracy basics, you can start comparing scanners feature by feature. Let’s go through the key criteria and also add a few often-overlooked ones that matter in everyday lab work.
Color or black and white
Color scanners capture the texture of the model: pencil lines, gingival shades, and reference marks, which can be especially helpful in RPD design, margin identification, and training less-experienced technicians.
Black-and-white scanners focus purely on geometry. They can be slightly simpler and sometimes cheaper, but you’ll sacrifice visual cues that are useful for communication and documentation.
-
Color may be worth the extra money if:
-
You draw detailed survey lines and clasp designs on models
-
You do a lot of RPDs, combination cases, or digital dentures
-
You collaborate closely with clinicians and want to show them details visually
-
You train new staff and want the software to be as clear and “readable” as possible
If your lab is almost exclusively crown & bridge with well-defined preps and experienced technicians, a monochrome scanner may still serve you very well — just make sure you’ve seen both in action before deciding.
Number of cameras (and why it matters less than you think)
More cameras can help capture undercuts and deep areas without having to reposition models as often. An extra camera can see into areas another camera cannot, potentially improving coverage and speed.
But the real story is the combination of optical design + software algorithms. Some two-camera scanners perform as well as three- or four-camera systems because of smarter positioning and data processing.
-
When you look at camera specs, ask:
-
Does the scanner capture deep preparations, implants, and dies without multiple rescans?
-
How many repositioning steps are needed for a typical full-arch or multi-die case?
-
Are there special scan strategies for edentulous arches, impressions, or articulated models?
-
How do actual users describe it: “set and forget” or “I’m constantly re-scanning missed areas”?
Don’t buy an extra camera just because it sounds better; buy it if it saves setup time and rescans in your most common indications.
Accuracy in daily lab life
We already covered the theory, so here’s how to keep accuracy grounded in reality.
First, understand that all scanners are somewhat environment-dependent: temperature, ambient light, operator technique, and model surface all play a role.
Second, accuracy needs to be thought of per indication. You don’t need the same tolerance for a wax-up mock-up as for a full-arch implant bar.
-
Practical accuracy checks to ask about or perform:
-
Can you scan and re-scan a complex case and get nearly identical results?
-
Do frameworks seat passively with minimal adjustment in your most demanding workflows?
-
Are remakes due to fit issues going down after adopting the scanner?
-
Is there a simple in-house test protocol (e.g., a reference object) to periodically verify performance?
If a vendor or reseller can show you before/after remake statistics or share anonymized QC data, that’s often more meaningful than a single accuracy number on a box.
Speed, automation & ergonomics (the invisible time-savers)
Two scanners with similar accuracy can feel completely different in day-to-day use because of speed and ergonomics.
A well-designed scanner will:
-
Minimize the number of manual steps
-
Offer pre-set workflows for typical case types
-
Reduce technician fatigue with approachable, predictable operation
-
Pay attention to:
-
Scan time per indication: single die, quadrant, full arch, impression, implant model
-
Batch capabilities: multi-die, multi-case scanning, auto-start when door closes, etc.
-
Fixture system: are model holders intuitive, stable, and compatible with articulated models?
-
Noise and footprint: important in small labs where space and comfort matter
Sometimes shaving a minute or two off each case — and eliminating constant rescans — has more financial impact than any difference in purchase price.
Dental lab software & ecosystem
The scanner hardware is only half the story; the software is the brain that determines what you can actually do with the scan. A rich software ecosystem is increasingly what separates competing systems.
Look at both the scanner software (for acquisition) and the CAD/CAM platform you’ll be designing in.
-
Software questions to ask:
-
Which indications are supported out of the box (crowns, bridges, implants, RPDs, dentures, aligners, splints, guides, etc.)?
-
Is the scan software intuitive, with guided workflows and clear error messages?
-
Can the system import and export open formats (STL, PLY, OBJ) to other software and hardware?
-
How frequently are updates released, and are they included in your license or subscription?
If you’re already using specific design software, prioritize scanners that integrate cleanly with it. If you’re starting from scratch, think about the long-term platform — not just the scanner — and what it will let your lab grow into.
Openness, integrations & data security (a new must-have)
Older generations of systems tended to be more “closed”: scans could only be used inside one ecosystem. Modern labs, however, often combine multiple scanners, CAD systems, mills, printers, and clinical partners. Interoperability has become a core buying criterion.
-
When evaluating openness and data handling:
-
Can you export standard formats and send them to any partner you choose?
-
Does the platform support integration with mills, 3D printers, and external services?
-
How are patient data and scans stored and backed up — locally, in the cloud, or hybrid?
-
Are there features to support data privacy compliance (e.g., HIPAA/GDPR-friendly workflows, user roles, audit logs)?
Think of your scanner as part of your lab’s IT backbone. You want a system that plays nicely with others and won’t trap you in a single vendor’s hardware lineup forever.
Support for lab scanners
Even the best scanner will occasionally misbehave: a calibration drifts, a firmware update fails, a technician accidentally knocks a model mid-scan. When that happens, support quality is the difference between a minor hiccup and a full-day production outage.
Vendors and resellers typically offer a mix of phone, remote desktop, knowledge bases, and sometimes on-site visits.
-
Evaluate support with questions like:
-
Who is my first line of help — the reseller, or the manufacturer?
-
What are the support hours, and in which time zone?
-
Is there remote diagnostics to quickly spot hardware vs. software issues?
-
Are loaner units or express replacement options available if the scanner needs repair?
If possible, talk to labs in your region using the same scanner. They’ll tell you very quickly how responsive support really is — and whether they feel taken care of.
The price of a dental lab scanner (and total cost of ownership)
The sticker price is only the beginning. Accuracy, software bundles, subscription models, and service agreements all strongly influence the true cost over time.
To compare scanners fairly, think in terms of total cost of ownership (TCO) over, say, five years.
Here’s a simple framework:
|
Cost component |
What it includes |
Questions to ask |
|
Initial hardware price |
Scanner unit, calibration tools, basic accessories |
What’s actually included? Any mandatory add-ons? |
|
Software licenses |
CAD modules, scanner software, design libraries |
Are licenses perpetual, subscription, or hybrid? What happens after year 1–3? |
|
Service & support |
Warranty, remote support, on-site visits, replacement coverage |
Is there a service tier that fits my risk tolerance and budget? |
|
Updates & upgrades |
New software versions, optional hardware upgrades |
Are updates included? Is there an upgrade path without rebuying the whole unit? |
|
Training & onboarding |
Initial training, ongoing education, learning materials |
Is training included or billed separately? For how many team members? |
|
Downtime & productivity impact |
Lost production when scanner is down or too slow |
If it fails, how fast can I be scanning again? What’s the typical response time? |
-
Financial “traps” to watch for: -
Very low entry price but mandatory expensive subscriptions after the first year
-
Limited base software that forces you to buy multiple modules for core workflows
-
No clear upgrade path — meaning you’ll need a full replacement sooner than expected
-
Hidden costs around PC specs, network infrastructure, and backup systems
Run a realistic 3–5-year scenario: estimate how many cases will go through the scanner, how much time you’ll save per case, and what each remake costs you now. Sometimes the “more expensive” scanner pays for itself faster because it reduces bottlenecks and errors.

Implementation & change management: making your scanner a success
Buying the scanner is the easy part. Making it part of your lab’s DNA is where the real work (and payoff) lies.
Plan your implementation like a mini-project:
-
Assign a project owner or “digital champion” who takes responsibility for rollout
-
Start with a limited set of indications (e.g., single crowns, simple bridges), then expand
-
Document standard scan protocols for each case type, including model preparation and naming conventions
-
Schedule regular calibration and basic maintenance into your production calendar
-
To keep the human side smooth:
-
Give technicians hands-on time with low-risk cases before high-stakes work
-
Celebrate quick wins (like a remake avoided or a faster turnaround) to build confidence
-
Encourage feedback loops: “What slowed you down today?” and refine workflows accordingly
-
Invest in ongoing training — digital tools change, and so do your indications
A well-implemented scanner doesn’t just “digitalize” your old workflow; it gives you a chance to rethink and improve how your lab operates.
Resources
There’s a lot of information out there, and not all of it is impartial. To stay grounded, combine manufacturer material with independent sources and your own testing.
Helpful resource types include:
-
Peer-reviewed articles comparing lab and intraoral scanner accuracy, trueness, and precision under standardized conditions
-
Standards documents (like ISO 12836) that explain how scanners are evaluated — even just reading summaries can be enlightening
-
Independent CAD/CAM education platforms and forums where technicians discuss real-world pros and cons
-
Vendor-agnostic webinars that walk through full digital workflows, not just one product
Use these resources to prepare a short internal checklist your lab uses whenever you evaluate any new digital technology, not just scanners.