What PSI Is a Dental Air Compressor? (And What That Really Means in Your Op)
If you’ve ever stared at the little pressure gauges in your mechanical room and thought, “Is that number actually right?” — you’re in exactly the right place.
Most articles give you a single PSI number and move on. In reality, your dental air system runs at several different pressures at once: tank, junction box, unit regulators, and handpiece drive pressure. Understanding how they relate is the difference between smooth days and mystery “my handpiece has no power” calls.
The super-short answer
Most modern dental air compressors are set up roughly like this:
-
Compressor tank (cut-in / cut-out): about 80–100 PSI (or, in some systems, 6–8 bar ≈ 85–115 PSI)
-
Junction box / main air supply to delivery units: typically around 80 PSI air / 40 PSI water
-
High-speed handpiece drive air at the coupling: usually 30–35 PSI (most sources agree not to exceed 35 PSI)
So when someone asks, “What PSI is a dental air compressor?” the most honest answer is:
A typical dental compressor is sized to deliver around 80 PSI to the clinic and cycles somewhere near 80–100 PSI at the tank, while your handpieces themselves actually run at about 30–35 PSI.
The rest of this guide unpacks that in a calm, practical, “I-just-want-my-op-to-work” way.
-
Key things you’ll walk away with:
-
How PSI, bar, CFM, and “those gauges” fit together.
-
What pressure ranges you should expect at each point in the system.
-
How incorrect PSI silently destroys handpieces (and how to stop it).
-
A simple method to check whether your current compressor setup actually matches your clinic’s demand.
First, let’s demystify PSI in a dental context
Pressure sounds abstract until you connect it to what you see day-to-day: sluggish handpieces, inconsistent air/water syringe spray, or noisy compressors that never seem to shut off.
PSI (pounds per square inch) is simply how hard the compressed air is pushing on every square inch inside your system. In dental, most manufacturers also list pressure in bar:
-
1 bar ≈ 14.5 PSI
-
So 5 bar ≈ 72.5 PSI, which is a very common specification for dental tools and handpieces.
You’ll see three main numbers in manuals and spec sheets:
-
Tank / storage pressure – inside the compressor’s tank.
-
Supply / line pressure – at the junction box feeding your delivery units.
-
Drive pressure – at the actual tool (your high-speed, low-speed, scaler, etc.).
Once you see PSI in layers like that, everything starts making sense.
-
Useful mental conversions for daily use:
-
5 bar ≈ 72–75 PSI → common handpiece requirement.
-
6–8 bar ≈ 85–115 PSI → healthy range for many dental compressors.
-
80 PSI air / 40 PSI water → “classic” dental junction box setup.

So… what PSI should your dental air compressor actually run at?
Let’s separate rating from real-world settings.
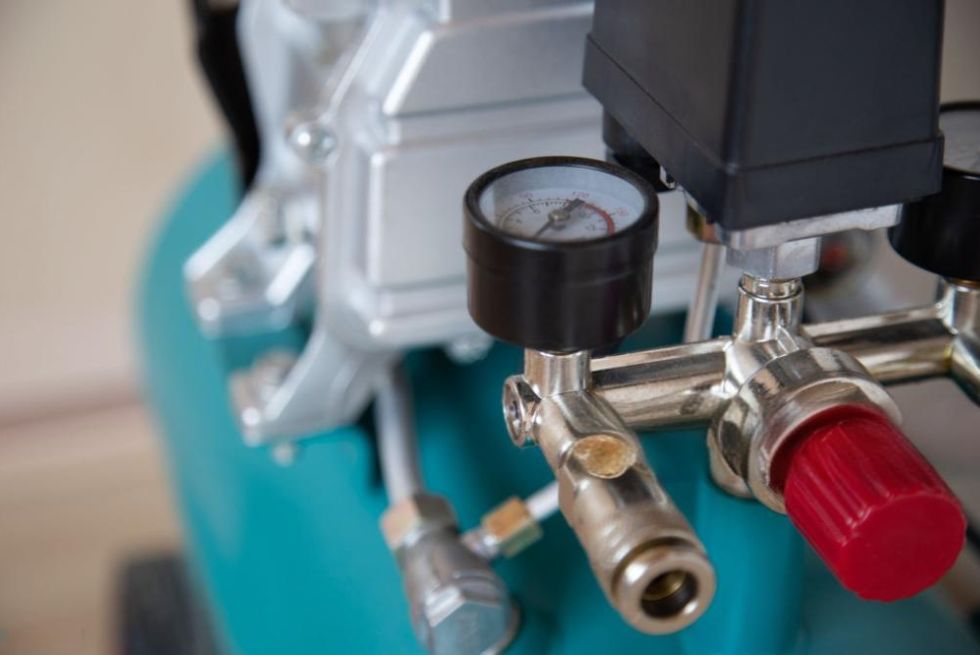
1. Compressor tank (the machine itself) Maintenance guides for dental compressors consistently recommend that the compressor cycles ON around 80 PSI and OFF around 100 PSI, or in some modern systems, maintains around 6–8 bar (≈85–115 PSI) as its working window.
That extra headroom ensures that, even when several tools are running, pressure at the operatory doesn’t sag below what your units need.
2. Junction box / utility center At the wall (or floor box) feeding your delivery units, most manufacturers and service bulletins point to:
-
Air: ~80 PSI
-
Water: ~40 PSI
This 2:1 ratio shows up again and again in dental pneumatics guidance.
3. Handpiece drive pressure at the connection This is the number most often misunderstood. While your compressor tank might see 100 PSI, your high-speed handpiece is not supposed to.
Independent handpiece specialists and manufacturers repeatedly recommend:
-
High-speed handpieces: about 32–35 PSI at the coupling, max 35 PSI.
-
Running above that significantly shortens turbine and bearing life without improving cutting performance.
Other tools often have slightly higher drive pressures (e.g., some slow speeds and scalers in the 40–50 PSI range).
-
In practice, a healthy system often looks like:
-
Compressor tank: cycles between 80–100 PSI (or roughly 6–8 bar).
-
Junction box supply: 80 PSI air / 40 PSI water going into each delivery unit.
-
Handpiece drive: 32–35 PSI measured at the handpiece connection, using a proper gauge.
The three “pressure zones” in your clinic (with reference ranges)
Think of your compressed air system like blood pressure in three different places: the heart, the arteries, and the capillaries.
Here’s a quick table to tie all of that together.
⚠️ Important: Always follow the specific numbers in your equipment manuals first. The ranges below are typical industry values from service guides and manufacturer resources, but individual brands and models can vary.
|
Where you measure |
What it feeds |
Typical PSI range |
Notes |
|
Compressor tank (storage pressure) |
Entire clinic |
~80–100 PSI (sometimes up to 115 PSI) |
Many dental compressors are set to cut in around 80 PSI and cut out around 100 PSI; some modern systems use 6–8 bar ≈ 85–115 PSI. |
|
Junction box / utility center – air |
Delivery units in each operatory |
~80 PSI |
Common recommendation in dental pneumatics guides and unit manuals. |
|
Junction box / utility center – water |
Handpieces, syringes, scalers (water side) |
~40 PSI |
Maintains ~2:1 air:water ratio. |
|
Delivery unit handpiece air regulator |
Each high-speed or low-speed handpiece |
High-speed: ~32–35 PSI |
It’s widely advised not to exceed 35 PSI at the coupling. |
|
Delivery unit handpiece air regulator |
~35–50 PSI |
Specific manuals list low-speed operating ranges in this band. |
|
|
Scaler regulator (air scaler / sonic scaler) |
Sonic scaler handpiece |
Often around normal handpiece drive PSI |
Many air scalers are designed to operate at ~32–35 PSI. |
You don’t need to memorize these; you want to recognize when one of them is wrong.
-
Why this layered view matters:
-
It explains how you can have 100 PSI on the compressor gauge and still have a weak handpiece if a regulator is mis-set.
-
It also shows why “turn it up to 60 PSI at the handpiece” is a fast way to turn turbines into consumables instead of investments.
Why getting PSI right matters more than you think
If air pressure is off, you usually notice symptoms before you notice the cause:
-
Patients feel more vibration, heat, or discomfort.
-
You or your associates start “leaning” harder with the bur to get the same cutting.
-
Handpiece repairs quietly creep up over the year.
-
The compressor runs more often, the room gets hotter, and you mentally file it under “annoying but normal”.
Behind the scenes, three things are happening when PSI is wrong:
-
Too low at the handpiece Low drive pressure means the turbine doesn’t spin at its designed RPM, so you get:
-
Poor cutting efficiency.
-
Longer chair time for the same prep.
-
A temptation to “compensate” by increasing pressure beyond recommended limits later.
-
Too high at the handpiece High pressure doesn’t give linear gains; past a point it mostly gives damage:
-
Bearings run hotter and wear out faster; most high-speed handpieces are built for ~32–35 PSI and are harmed by 50+ PSI.
-
Turbine speeds can exceed the design RPM, stressing components.
-
Too low at the junction box or tank If your compressor is undersized or mis-set, you may never actually sustain the 80 PSI you think you have at the ops when several chairs are active. Guides for compressor sizing warn that if tank pressure doesn’t stay in the 80–100 PSI band under load, unit performance will suffer.
-
In other words:
-
Handpiece PSI affects cutting performance, heat, and turbine life.
-
Junction box PSI affects every device in that room.
-
Tank PSI and compressor sizing affect the entire clinic’s ability to treat patients during busy blocks.
How PSI affects your choice of dental air compressor
Most “what PSI do I need?” conversations should really be: “Can my compressor maintain the right PSI while supplying enough air (CFM) to all active chairs?”
PSI is the pressure, CFM is the volume of air. You need both.
Selection guides for dental compressors often suggest:
-
Designing for something like:
-
2 CFM @ ~40 PSI per operatory (rule of thumb).
-
A dental chair itself may consume ~0.5–1 CFM at around 80 PSI depending on what’s running.
-
Many dental compressors for small clinics are in the 2–3 CFM @ ~80 PSI range per head.
Overlay PSI onto that picture:
-
Your compressor should be able to deliver enough CFM at 80 PSI (or 5 bar / 72–75 PSI) so that when multiple handpieces fire at once, the tank pressure doesn’t sag below your target.
-
Many dental tools are rated around 5 bar (~72.5 PSI), so selection guides recommend setting the system slightly above that to compensate for pressure drops in piping and filters.
-
Think of PSI in compressor shopping like this:
-
PSI rating tells you whether the compressor can reach the pressure your tools need.
-
CFM @ that PSI tells you whether it can keep up when you actually work.
-
Cut-in / cut-out (e.g., 80–100 PSI) tells you how much wiggle room the system has under load.
A simple 5-step method to check your current setup
Here’s a straightforward way to sanity-check your PSI across the system. You don’t have to be an engineer, just methodical.
-
1. Check tank cut-in / cut-out
-
Watch the compressor’s tank gauge.
-
Note the pressure where it starts (cut-in) and stops (cut-out).
-
You’re generally aiming for something around 80–100 PSI, unless your compressor’s manual specifies a different band.
-
2. Check junction box air and water
-
In each operatory, find the J-box gauges or utility center.
-
Confirm that air is ~80 PSI and water is ~40 PSI.
-
If they’re wildly off, correcting them often fixes “mystery” performance problems.
-
3. Measure handpiece drive PSI correctly
-
Use a handpiece pressure test gauge (not the unit’s panel gauge).
-
Attach it at the handpiece connection, press the foot pedal fully, and read the value.
-
Adjust the handpiece regulator on the delivery unit to land around 32–35 PSI for your high-speed, unless the manufacturer says otherwise.
-
4. Simulate peak usage
-
Run the number of handpieces / scalers you’d use at your busiest moment.
-
Watch whether:
-
Tank pressure drops below your cut-in.
-
Junction box PSI dips significantly below 80 PSI.
-
If pressure falls and stays low, you may have undersized capacity, leaks, or restriction.
-
5. Factor in your dryer and filters
-
Refrigerated dryers often require air above a certain PSI to achieve their dew point; some guides recommend lowering pressure to around 55 PSI inside the dryer but maintaining adequate pressure in the overall system.
-
Clogged filters can create pressure drop that mimics an undersized compressor.
If at any stage something doesn’t line up with your manuals or the ranges here, that’s your cue to involve your dental equipment tech.

Common PSI mistakes that quietly cost you money
Most PSI problems don’t feel dramatic; they just nibble away at your equipment and time.
-
Cranking up handpiece PSI “for more torque”
-
Above ~35 PSI, you’re mostly buying wear, not power. High pressure warps bearings, overheats turbines, and shortens life.
-
Trusting only the delivery unit gauge
-
Many experts insist you should measure at the handpiece connection using a test gauge, not just the panel gauge, because internal restrictions create a difference between the two.
-
Under-sized compressor with “okay” PSI on paper
-
It might reach 100 PSI at rest, but under load, tank pressure can sag, causing unit pressure to drop below 80 PSI during busy times. Sizing guides warn that this leads to sluggish tools and compressor over-working.
-
Ignoring moisture and air quality because “PSI looks fine”
-
You can have perfect PSI but contaminated air. Dental compressors are expected to deliver clean, dry, oil-free air; dew point and filtration efficiency matter just as much as pressure.
- Quick checklist to stay out of trouble:
-
-
[ ] Tank cut-in / cut-out roughly matches manufacturer specs (often ~80–100 PSI).
-
[ ] Junction box air around 80 PSI; water around 40 PSI.
-
[ ] High-speed handpieces measured at 32–35 PSI at the coupling.
-
[ ] Compressor doesn’t run almost constantly during normal clinic flow.
-
[ ] Dryers and filters are maintained so PSI isn’t being “lost” through restriction.
-
How to talk to your supplier or tech about PSI (without getting lost)
When you’re upgrading or troubleshooting, PSI is one of the clearest ways to have a productive conversation with your dealer or service technician.
In that conversation, think in terms of scenarios, not just numbers:
“We run 4 chairs, busiest blocks are 2 hygienists and 2 doctors using high-speed or scalers simultaneously. We need stable 80 PSI at the ops and safe 32–35 PSI at the handpieces, with capacity to grow to 5 chairs.”
This lets your supplier:
-
Match a compressor that can deliver the required CFM at ~80 PSI with comfortable overhead.
-
Factor in dryer pressure losses and piping runs.
-
Ensure the cut-in / cut-out range supports your peak load, not just idle conditions.
You’re not just asking, “What PSI is this compressor?” — you’re asking, “Can this compressor keep my system within the right PSI ranges under real clinical use?”
- Tools and data worth having on hand:
-
-
Number of chairs and which ones are realistically used at once.
-
Any existing gauge readings (tank, J-box, handpiece) at busy times.
-
Handpiece brands/types that might have special pressure requirements.
-
Whether your clinic uses refrigerated or desiccant air dryers.
-
FAQs: Fast answers you can skim between patients
Q1: My handpiece feels weak. Should I just turn up the PSI? Usually no. First check:
-
Is the junction box actually at ~80 PSI?
-
Is the handpiece drive really 32–35 PSI at the coupling (measured with a gauge)? If both are correct, the problem may be the handpiece, the tubing, or maintenance—not low PSI.
Q2: The compressor gauge shows 110 PSI. Does that mean my handpiece is over-pressured? Not necessarily. That gauge is usually tank pressure. Regulators along the way “step down” pressure to safe levels for the unit and handpieces. You only know your true handpiece PSI by measuring at the connection.
Q3: A sales page says, “Most dental tools need 90–100 PSI.” Is that wrong? It’s incomplete. Some buying guides describe supply or compressor capability at 90–100 PSI to ensure tools that require around 5 bar (~72.5 PSI) always have enough pressure after line losses. Your handpieces themselves still generally run at about 32–35 PSI at the connection; the higher compressor PSI just ensures that, after regulation, you have what you need.
Q4: How often should I actually check all these pressures? At minimum:
-
When you install new equipment or a new compressor.
-
When you notice changes: weaker spray, longer cutting times, more repairs, noisier compressor.
-
As part of an annual maintenance visit, many compressor PM guides explicitly call for verifying 80–100 PSI cycling and ~80 PSI at the J-box.
Q5: Is there such a thing as “too high” PSI at the tank? Yes. Excessively high tank pressure:
-
Puts more stress on the compressor and components.
-
Can exceed the ratings of downstream equipment.
-
Usually isn’t needed clinically—most guides recommend staying within that ~80–100 PSI window unless you have specific high-pressure devices and matching infrastructure.
Bringing it all together
If you remember only one thing from this article, let it be this:
“What PSI is a dental air compressor?” really means “Are all three pressure zones — tank, junction box, and handpiece — in the right ranges for what we do every day?”
When they are:
-
Your handpieces feel consistent.
-
Your compressor breathes easily instead of gasping.
-
You spend less on surprise repairs and more time actually treating patients.