Essential Guidelines for Dental Ultrasonic Cleaner Maintenance: Ensuring Optimal Instrument Cleaning
This article provides a comprehensive guide to maintaining and caring for your dental ultrasonic cleaner, ensuring optimal performance and longevity. For dentists, dental clinics, dental labs, dental hospitals, and dental schools, understanding the intricacies of ultrasonic cleaning is crucial for maintaining the highest standards of hygiene and instrument care. This guide is worth reading because it offers practical, step-by-step instructions, expert advice, and addresses common issues, helping you maximize the lifespan and effectiveness of your dental ultrasonic cleaner.
Detailed Explanation of Each Subheader
1. Why is Proper Ultrasonic Cleaner Maintenance Essential in Dental Practices?
Proper maintenance of a dental ultrasonic cleaner is paramount in any dental setting. It directly impacts the effectiveness of sterilization processes and the longevity of dental instruments and equipment. Regular cleaning prevents the build-up of debris, bioburden, and mineral deposits within the tank, which can hinder the ultrasonic cleaning process and potentially contaminate instruments. ISTAR Dental Supply emphasizes that consistent care ensures the cleaner functions optimally, providing reliable and effective cleaning for all your dental tools.
Furthermore, well-maintained equipment reduces the risk of cross-contamination between patients, upholding the highest standards of hygiene in your dental practice. Neglecting maintenance can lead to costly repairs or even premature replacement of the unit. By following a strict maintenance schedule, you protect your investment and, more importantly, the health and safety of your patients and staff. A clean ultrasonic cleaner is more than about the cleaner; its is also a dental practice's commitment to pristine hygene.
2. What are the Key Components of a Dental Ultrasonic Cleaner?
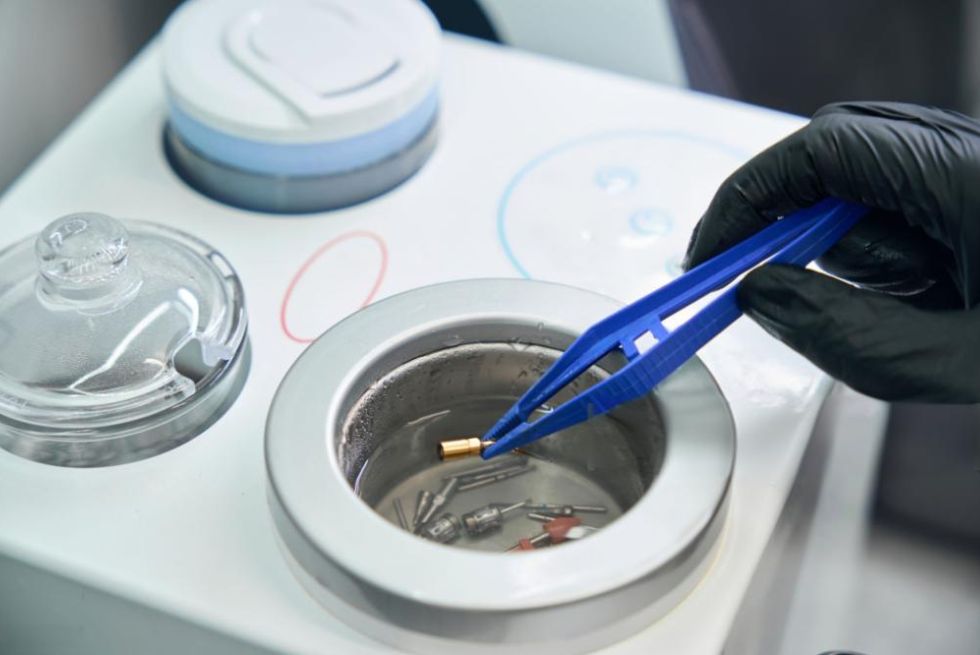
A dental ultrasonic cleaner is a sophisticated piece of equipment with several key components working in harmony. Understanding these parts is crucial for effective care and troubleshooting. The primary component is the tank, typically made of stainless steel, which holds the cleaning solution and the instruments to be cleaned. Transducers, located at the bottom of the tank or on the sides, generate high-frequency sound waves that create the cavitation bubbles responsible for cleaning.
The unit also includes a control panel to adjust settings like cleaning time and temperature, a heating element (in some models), and a drain for easy disposal of used cleaning solution. Some advanced models, like those offered by ISTAR Dental Supply, may feature digital displays, degas functions, and sweep frequency technology for enhanced cleaning performance. A lid helps to contain noise and prevent splashing of the liquid. Regular care for all these components will ensure your dental ultrasonic cleaner will function optimally.

3. Step-by-Step Guide to Cleaning Your Dental Ultrasonic Cleaner
Cleaning your dental ultrasonic cleaner is a straightforward process, but it must be done correctly to avoid causing damage. Follow these steps:
- Disconnect and Empty: Unplug the cleaner from the power source and empty the tank of any remaining cleaning solution.
- Rinse the Tank: Rinse the tank thoroughly with clean water to remove loose debris.
- Clean the Interior: Use a soft cloth or sponge and a mild, non-abrasive detergent to wipe down the interior surfaces of the tank. Avoid harsh chemicals or abrasive cleaners that could scratch the material.
- Clean the Exterior: Wipe down the exterior of the unit with a damp cloth.
- Thoroughly dry the inside and out.
ISTAR Dental Supply recommends performing this cleaning procedure after each use or at least daily, depending on your usage frequency.
4. Choosing the Right Cleaning Solution for Your Dental Ultrasonic Cleaner
Selecting the appropriate cleaning solution is critical for effective cleaning and to protect your dental instruments and the ultrasonic cleaner itself. Always use a cleaning solution specifically designed for ultrasonic cleaners in dental applications. These solutions are formulated to enhance cavitation and break down bioburden, blood, and other organic materials commonly found on dental tools.
Avoid using general-purpose cleaners, household detergents, or solvents, as they can damage the tank and other components of the cleaner. ISTAR Dental Supply offers a range of cleaning solutions tailored to different dental needs, ensuring compatibility with our ultrasonic cleaners. Always follow the manufacturer's instructions regarding the correct water to solution ratio and temperature settings.
5. How Often Should You Clean Your Dental Ultrasonic Cleaner?
The frequency of cleaning depends on usage, but a general guideline is to clean your dental ultrasonic cleaner after each use or at least once a day if used frequently. This prevents the build-up of residue and ensures consistent cleaning performance. In a busy dental clinic or hospital, more frequent cleaning may be necessary.
In addition to daily cleaning, it's recommended to perform a more thorough cleaning and inspection monthly. This includes checking the transducers for any signs of wear or damage and descaling the tank if hard water deposits are present. ISTAR Dental Supply provides detailed maintenance schedules in our product manuals to help you keep your cleaner in top condition.
6. Troubleshooting Common Issues with Dental Ultrasonic Cleaners
Even with proper care, you may encounter occasional issues with your dental ultrasonic cleaner. Here are some common problems and potential solutions:
- Reduced Cleaning Effectiveness: This could be due to old or incorrect cleaning solution, low water level in the tank, or failing transducers. Try replacing the solution, ensuring the tank is filled to the appropriate level, and if the problem persists, consult a professional.
- No Power or No Ultrasonic Activity: Check the power cord and outlet. If the unit is plugged in but not working, there may be an internal electrical issue requiring professional repair.
- Unusual Noises: Some noise is normal, but excessive rattling or buzzing could indicate a loose component or a problem with the transducers.
- If the unit does not turn on, check to see that it is plugged in correctly.
ISTAR Dental Supply's customer support team is available to assist with troubleshooting and, if necessary, arrange for repairs under warranty.
7. What are the Risks of Improper Ultrasonic Cleaner Maintenance?
Neglecting the maintenance of your dental ultrasonic cleaner carries significant risks. Primarily, it compromises the effectiveness of the cleaning and sterilization process. A dirty cleaner can re-deposit debris onto instruments, increasing the risk of infection and cross-contamination in your dental practice.
Improper maintenance can also lead to damage to the cleaner itself. Mineral deposits from hard water can build up on the transducers, reducing their efficiency and potentially causing them to fail. Using the wrong cleaning solution can corrode the tank or damage other components. These issues can result in costly repairs or the need for a premature replacement.

8. How to Ensure Optimal Performance of Your Ultrasonic Cleaner?
To ensure your dental ultrasonic cleaner performs optimally, follow these guidelines:
- Use the Correct Cleaning Solution: Always use a solution specifically formulated for dental ultrasonic cleaners, and follow the manufacturer's instructions for dilution and temperature.
- Properly Load Instruments: Avoid overcrowding the tank. Instruments should be fully submerged in the cleaning solution but not touching each other or the sides of the tank.
- Degas the Solution: Before each cleaning cycle, run the cleaner with fresh solution for a few minutes to degas it, removing trapped air that can interfere with cavitation.
- Regularly Monitor Performance: Periodically check the cleaning effectiveness using foil testing or other methods recommended by the manufacturer.
- Regular Cleaning: Per the above steps, clean your unit after each use, making sure to dry the tank and outter surfaces thoroughly.
ISTAR Dental Supply's ultrasonic cleaners are designed for ease of use and maintenance, helping you achieve consistent and reliable results.
9. Best Practices for Dental Instrument Cleaning Using an Ultrasonic Cleaner
Using an ultrasonic cleaner is an essential step in the dental instrument reprocessing process, but it's not a substitute for sterilization. Here are some best practices:
- Pre-Clean Instruments: Before placing instruments in the ultrasonic cleaner, remove gross debris by rinsing or wiping them.
- Disassemble Instruments: If possible, disassemble instruments into their component parts to allow the cleaning solution to reach all surfaces.
- Use a Basket or Tray: Place instruments in a basket or tray designed for ultrasonic cleaning to prevent them from resting on the bottom of the tank, which can reduce cleaning effectiveness and damage the transducers.
- Run the Appropriate Cleaning Cycle: Follow the manufacturer's recommendations for cleaning cycle time and temperature, based on the type of instruments and the cleaning solution being used.
- Rinse Thoroughly: After the cleaning cycle, rinse the instruments thoroughly with clean water to remove any remaining cleaning solution and debris.
- Sterilize: Clean but used instruments will need to be sterilized prior to next use.
Following these practices will ensure that your dental instruments are thoroughly cleaned and ready for sterilization.
10. What Should You Never Leave in a Dental Ultrasonic Cleaner?
Certain items and materials should never be placed or leave in a dental ultrasonic cleaner, as they can damage the cleaner or the items themselves:
- Aluminum Foil (Except for Testing): While aluminum foil is used for testing ultrasonic activity, it should never be left in the cleaner for an extended period as it can disintegrate and contaminate the cleaning solution.
- Plastics Not Rated for Ultrasonic Cleaning: Some plastics can be degraded or damaged by ultrasonic waves. Check the material compatibility before placing plastic items in the cleaner.
- Handpieces (Unless Specifically Designed for Ultrasonic Cleaning): Most dental handpieces should not be cleaned in an ultrasonic cleaner unless the manufacturer explicitly states that it is safe to do so. Check out ISTAR's Dental Handpiece collection for options that are compatible with ultrasonic cleaning.
- Instruments with Loose Parts: Small, loose parts can become dislodged during the cleaning process and potentially damage the cleaner or be lost.
- Never allow the water or solution to leave residue on dental instruments.
Always consult the manufacturer's instructions for your specific ultrasonic cleaner and instruments to determine what is safe to clean.
FAQs
-
Can I use tap water in my dental ultrasonic cleaner?
While tap water can be used, distilled or deionized water is preferred, especially in areas with hard water. Hard water can lead to mineral deposits that can build up in the tank and affect the cleaner's performance.
-
How do I know if my ultrasonic cleaner is working properly?
A simple test is the "foil test." Suspend a piece of aluminum foil in the tank filled with cleaning solution and run the cleaner for a short period. If the cleaner is working correctly, the foil should develop small holes and indentations.
-
What's the best way to maintain my dental curing light?
To keep your dental curing lights functioning correctly, be sure to perform regular check on the intensity. Also, clean the light guide after each use. ISTAR has a great collection of Dental Curing Light products.
-
What is the difference between ultrasonic cleaning and sterilization?
Ultrasonic cleaning removes debris and contaminants from instruments, but it does not kill all microorganisms. Sterilization, typically done in an autoclave, is necessary to kill all forms of microbial life, including spores. Ultrasonic cleaning is a crucial pre-sterilization step.
-
How long should I run the cleaning cycle? It is important to follow your ultrasonic cleaner's user manual for instructions on cleaning cycle duration.
-
How do I find out more information about purchasing a quality dental ultrasonic cleaner? For all of the dental professionals out there looking to invest in a quality ultrasonic cleaner, contact ISTAR today. We have the expertise to help you understand all the options and which best meet your dental practice needs.
Summary
Here's a summary of the most critical points to remember for dental ultrasonic cleaner care:
- Regular Cleaning is Key: Clean your ultrasonic cleaner after each use or at least daily.
- Use the Right Solution: Always use a cleaning solution specifically designed for dental ultrasonic cleaners.
- Follow Manufacturer's Instructions: Adhere to the guidelines provided by the manufacturer for cleaning, maintenance, and solution usage.
- Monitor Performance: Regularly check the cleaning effectiveness of your cleaner.
- Avoid Damaging Materials: Never place incompatible materials or items in the cleaner.
- Ultrasonic Cleaning is Not Sterilization: Always sterilize instruments after ultrasonic cleaning.
- Proper Maintenance Ensure quality of instruments and saftey to your patients.
By following these guidelines, you can ensure that your dental ultrasonic cleaner, a vital tool in your practice, remains in optimal condition, providing years of reliable service and contributing to the highest standards of patient care. ISTAR Dental Supply is committed to providing high-quality dental equipment and the support you need to maintain it. Consider exploring our Dental Equipment section, and for those in orthodontics, our Orthodontics collection may be of interest. For sterilization needs, check out our Dental Sterilization products, specifically the Autoclave Dental units, and our Ultrasonic Cleaner Dental selection.

